
HaloTherapyPRO Setup Instructions
Congratulations on your purchase of the HaloTherapyPRO! Enjoy convenient, professional-grade halotherapy sessions in your own space.
System Setup
5 steps
System Setup
Step 1 – Unpack the Box
Carefully remove all items from the packaging.
You should have: • HaloTherapyPRO unit • Salt cover (salt lid) • Fan housing with fan installed • Power cord • 1 lb bag of HaloTherapy Salt
Step 2 – Position the HaloTherapyPRO
Place the unit in its designated location.
• Place the HaloTherapyPRO in its designated location, such as a booth, room, or tent.
• Set it on a stable, flat surface with adequate airflow around the unit.
Step 3 – Install the Fan Housing
Connect and seat the fan housing on top of the unit.
• Plug the fan into its connector on the HaloTherapyPRO, if it is not already connected.
• Insert the fan housing into the slot on top of the HaloTherapyPRO.
Step 4 – Add the HaloTherapy Salt
Load the salt bowl with the included HaloTherapy Salt.
• Ensure the salt bowl is properly seated in the unit.
• Place the salt lid over the salt bowl.
• Add 1 teaspoon of the included HaloTherapy Salt.
Step 5 – Power On
Connect power and switch the unit on.
• Plug the included power cord into the HaloTherapyPRO.
• Plug the other end into a suitable wall outlet.
• Switch the unit on.
Run Time & Pause Settings
3 steps
Operating Cycle Information
Each device is tested and pre-programmed before shipping.
Your HaloTherapyPRO operates on the following pre-set cycle:
• 10 seconds ON
• 30 seconds OFF
Depending on the size of your booth, room, or tent, runtime may be adjusted at your discretion for the ideal session.
Recommended Settings
• Grind: 10 seconds
• Pause: 30 seconds
Adjusting Time
Adjusting Grind & Pause Times
Change how long your HaloTherapyPRO Grinds and Pauses.
1. Press SET once. The red display (Grind Time) will flash.
2. Use the ▲ / ▼ buttons to set the desired run (grind) time.
3. Press SET again. The blue display (Pause Time) will flash.
4. Use the ▲ / ▼ buttons to set the desired pause time.
5. Wait 6 seconds. The settings will automatically save.
Important: Two Control Module Types
HaloTherapyPRO units may be equipped with one of two different control modules. The instructions below apply only to the controller that does NOT display ON and OFF on the screen. If your controller displays ON or OFF, please .
Mode Setup
4 steps
Important
Use this section if your HaloTherapyPRO is not automatically cycling between run time and pause time. These settings control how the unit runs for a set period, pauses for a set period, and then repeats automatically — so you get consistent sessions without having to restart the unit manually.
Before You Begin — How the Controls Work
Learn how the controls work before starting Step 1.
Before You Begin
Watch the video above to learn how the settings work. Do not change anything yet. When you are ready to program the control panel, begin with Step 1.
P0 and P1 are setting names and do not change.
Hold SET for 3 seconds to enter the settings.
Press SET to switch between P0 and P1.
Use ▲ / ▼ to change the number shown below P0 or P1.
Ready to program? Start with Step 1 below.
Halogenerator Control Panel Setup Guide
Your HaloTherapyPRO arrives **fully programmed and ready to use.** Only follow these instructions if your control panel settings need to be reset.
Control Panel Overview
* P0 / 0 = Timer set to seconds
* P1 / 5 = Automatic cycle setting
* Red display = Grinder ON time
* Blue display = Grinder PAUSE time
Important: P0 and P1 are the setting names. The number shown below each setting is the value that you change.
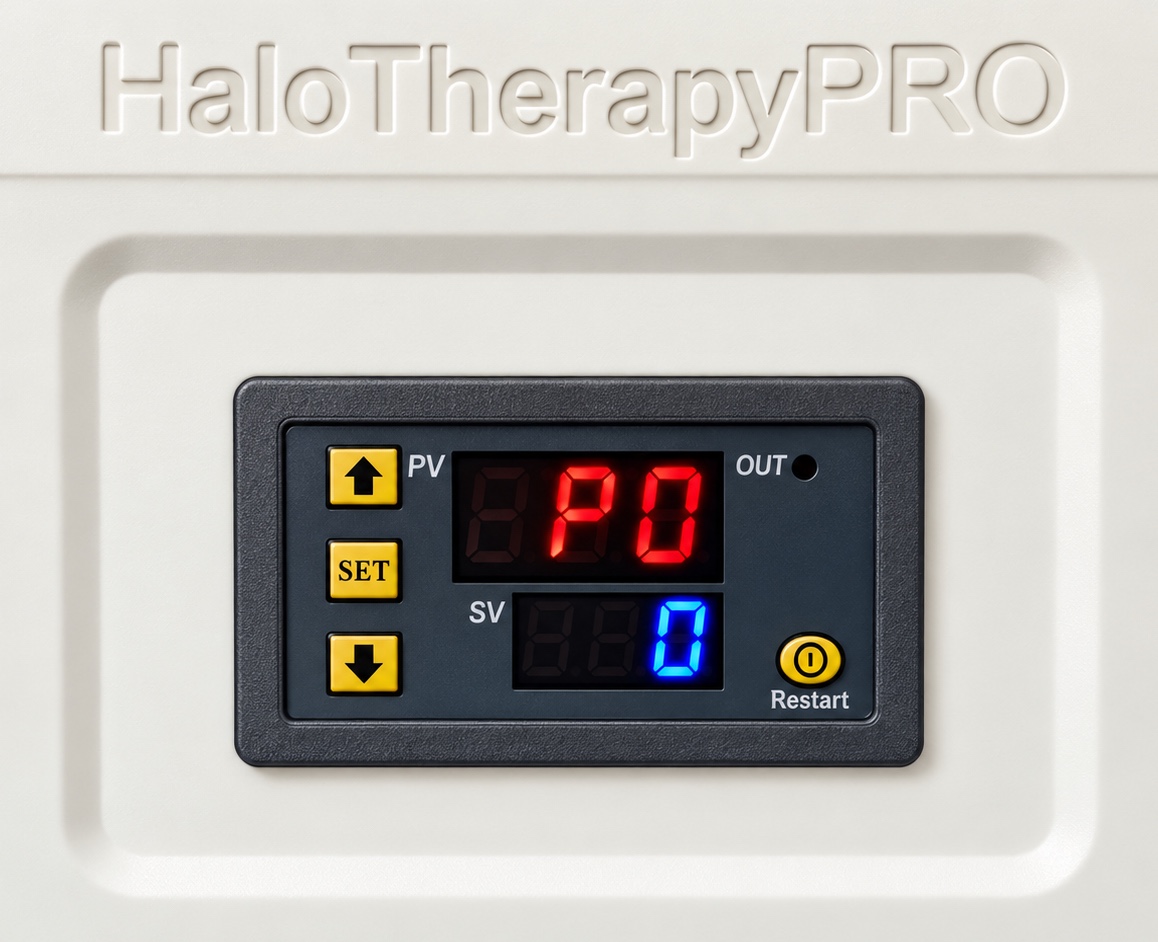
Step 1 – Set Timer Mode (P0)
Set the bottom value to 0. The P0 setting name will stay the same.
1. Press and hold SET for 3 seconds to enter Mode Setup.
2. The display will show P0. P0 is the setting name and will not change.
3. Use the ▲ / ▼ buttons to change the bottom value until it shows 0.
4. The display should now show:
P0
0
5. Press SET to continue.
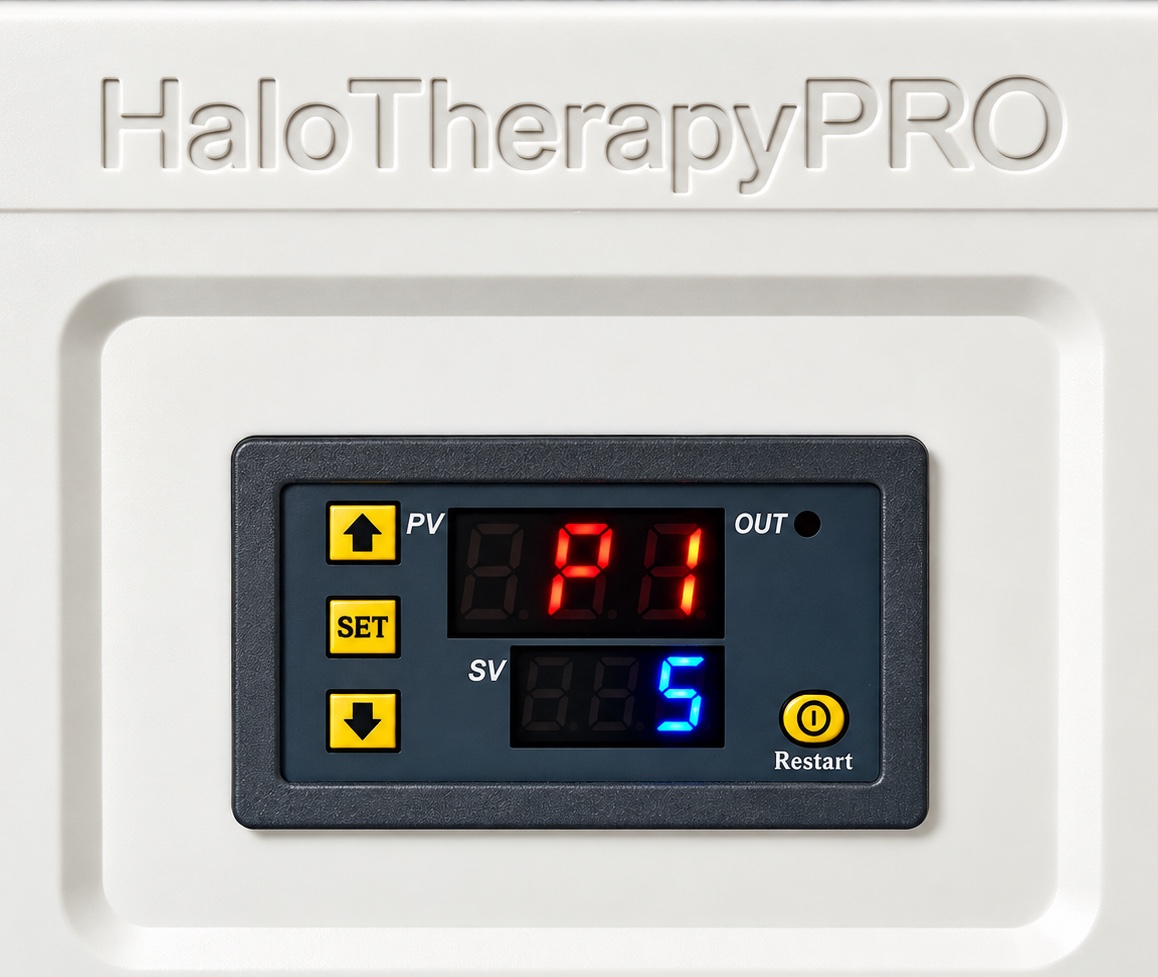
Step 2 – Set Operating Mode (P1)
Set the bottom value to 5. The P1 setting name will stay the same.
Set the bottom value to 5. The P1 setting name will stay the same.
IMPORTANT: Complete this step within 3 seconds of Step 1. If you wait too long, the settings will save automatically and you will need to start again at Step 1.
1. After completing Step 1, P1 will appear on the display.
2. P1 is the setting name and will not change.
3. Use the ▲ / ▼ buttons to change the bottom value until it shows 5.
4. The display should now show:
P1
5
5. Wait a few seconds for the settings to save automatically.
Support & Warranty
For additional information, customer support, or warranty claims, please visit www.HaloTherapyPRO.com. Thank you for choosing HaloTherapyPRO. Enjoy your halotherapy experience.
Contact Support